Your network work area or your disk can be compared with a physical filing cabinet. As you save each piece of work, the file is stored in an electronic filing cabinet.
As with a real filing cabinet it is essential to maintain some structure to the way information or files are stored.
So, just as a physical filing cabinet can be sub-divided into drawers and partitions within drawers, so can the electronic filing cabinet.
With Windows 95/98/2000, electronic drawers are called folders and are shown as a folder icon with an associated name:
![]()

Files are represented by file icons showing the associated application (if it is available to your system) eg this icon represents a Word document


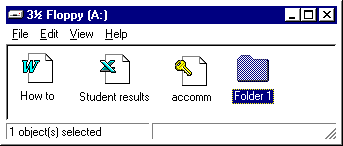
When you look at the window of your disk or network space it will look similar to this:


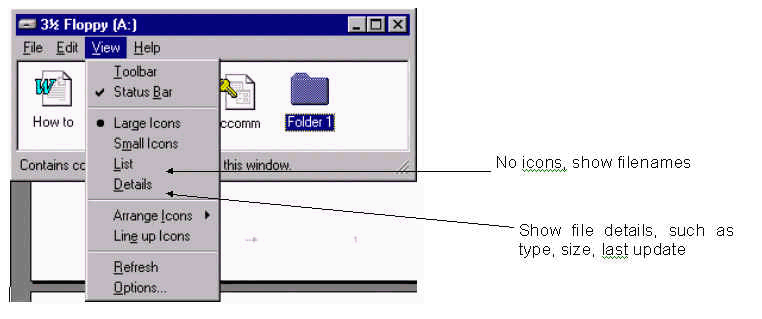
To view details about your files, click on the View menu and select which view you want to see your files in:

Minimise any windows that you have open so that you can see the desktop.
Note: If the disk has not been previously formatted then you will be prompted to format it before using it for the first time.
Open the 3.5" window
Minimise any windows that you have open so that you can see the desktop.
Minimise any windows that you have open so that you can see the desktop.
Double click on the drive icon that you want to open. (To create a new folder in your Network space – double click My Computer, look for your workspace area in the window, double click to open)
Click File.
Select New followed by Folder.
Rename the folder by overtyping New Folder.
Open the windows as before.
Select or click the file and with the left mouse held down, ‘pick up’ the file and ‘drop’ it on the folder.
Note that the file will disappear from the window. To view the contents of a folder, double click on the folder.
Open the window of the drive you wish to copy from and the window of the drive you wish to copy to.
Click on the file to be copied with the left mouse button.
Press right mouse button and choose Copy.
Press the right mouse button in the window you wish to copy the file to and choose Paste.
Open the window of the drive you wish to move from and the window of the drive you wish to move to.
Click on the file to be moved with the left mouse button.
Hold down the Shift key.
Pick up the file and drop it on the storage area where you want to move the file to.
In the appropriate window, click the file you wish to delete.
Press the Delete key on the keyboard.
Open both drive windows.
Select all the files from the source disk (ie the drive you wish to copy from) either using the Edit menu and Select All or press Ctrl A on the keyboard.
Pick up and drop the files on to the destination disk.
Point the mouse over the file or folder you wish to rename.
Press the right mouse button.
Select Rename.
Type in the new name and press Enter.
Point and click the File menu and select Save As.
In the File Name box, type A: followed by the name you wish to give to the file.
Click Save.